 Now that I have completed my research, I can begin to construct my contents page, or rather the first draft of it. Firstly, I have to place my magazine logo in the top, left hand corner of the page, as matched by my plan.


 After I had written this, I decided that I should change my background colour to match my research, rather than focus on the same colour. I made the entire background white, similar to the issue of Kerrang! I looked into.
To accompany my Editor's message, I have added a subscription offer onto my contents page, as this a prominent feature of other magazines, and I feel it suits my contents page. I also made the heading of 'Subscribe' larger than the rest of the text to make it more prominent.

Whilst I like the red colour scheme which I have taken across from the cover, I feel that I need to change the colours of some of my text, and so I changed some of my work to black text, rather than red. I also added a date and issue number just below the 'Inside this issue' section at the top of the page.


The next step was to add my actual contents to my contents page. This was copied across from an earlier post, where I listed what I would include in my magazine.

However, I didn't like the way the text all appeared to be the same, so I added some blocking behind the headings to make them more prominent.
However, these, I feel, were far too short, and so I made them longer, and of a matching length to make sure my magazine looked more professional.


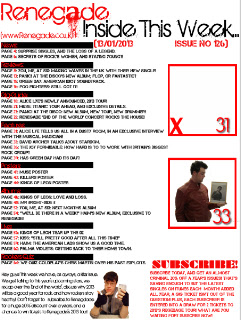
The next step for me was to add my pictures. Since I intend for one of my photographs to be a preview of my contents page, that has to be done before I can take the photograph, so for now, I shall have to add a cross to the box where it would go, along with the page number for the respective page in the magazine, and address this later on.

Next, I have to add the picture of my second artist to the box below this. Then, once I have added my editor's photo, I am finished.


Now, here is my first draft of my contents page, without my double page spread picture:
No comments:
Post a Comment